Perek 2 m · Ondřejov · prism spectrograph
FLORES Night Procedure
Part A sets the instrument up, once, at the start of the night. Part B is the loop you repeat for every object. Do them in that order and you get a spectrum.
The five windows
Everything below happens in one of these. When a step says which, it means it.
MainWindow.Make FLORES the instrument
Once per night, before anything else. At the end of this part the telescope is a spectrograph and the calibration for the night is in the bag.
Open the windows
No terminal. Both clients are in the window manager menu.
Start FLORES and Fiber pointing client EXPERIMENTAL 2026 from the menu, and have TOPTEC and ObserveClient 630 where you can reach them. Arrange them so both images are visible at once — you will be looking back and forth all night.
The ordinary pointer centres on whatever is brightest in the field. The fibre pointing client lets you centre on your object, which is the whole difference between observing a bright star and observing something faint enough to be interesting.
If you are in a shell anyway
The same two programs are aliased flores and fp. You should not
need them: the menu entries are the supported way in, and nothing else in this procedure wants
a terminal except ssh flores at the end, to fetch the data.
Spectral filter to 4
ObserveClient 630 → Spectrograph tab. This is what sends the light into FLORES.
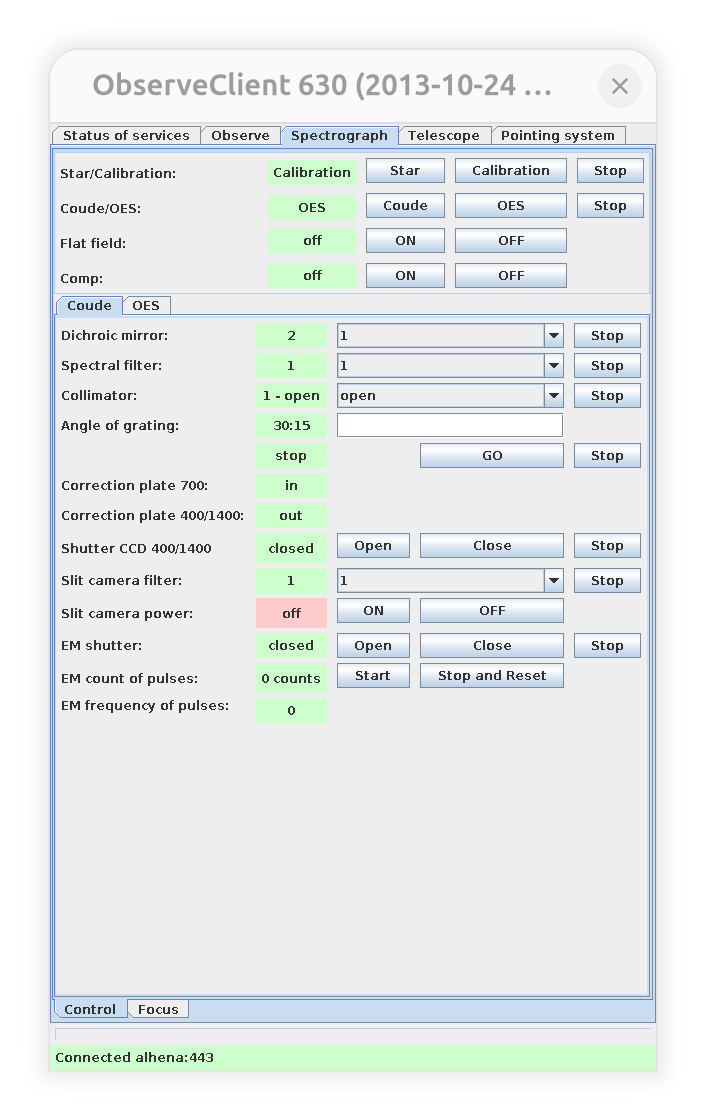
The Flat field and Comp buttons here are not the lamps
The Flat field and Comp ON/OFF rows at the top of this tab are not
live relays for FLORES. The lamps you want are Relay 1 COMP and Relay 2 FLAT in
TOPTEC. Pressing these does not give you a comp.
This move starts a session
The wheel carries the mirror, so rotating it shifts the wavelength scale. Everything from this move until the next one is one session, and a session needs its own comp — see A5. The wheel never moves on its own, so a session lasts exactly as long as you leave it alone.
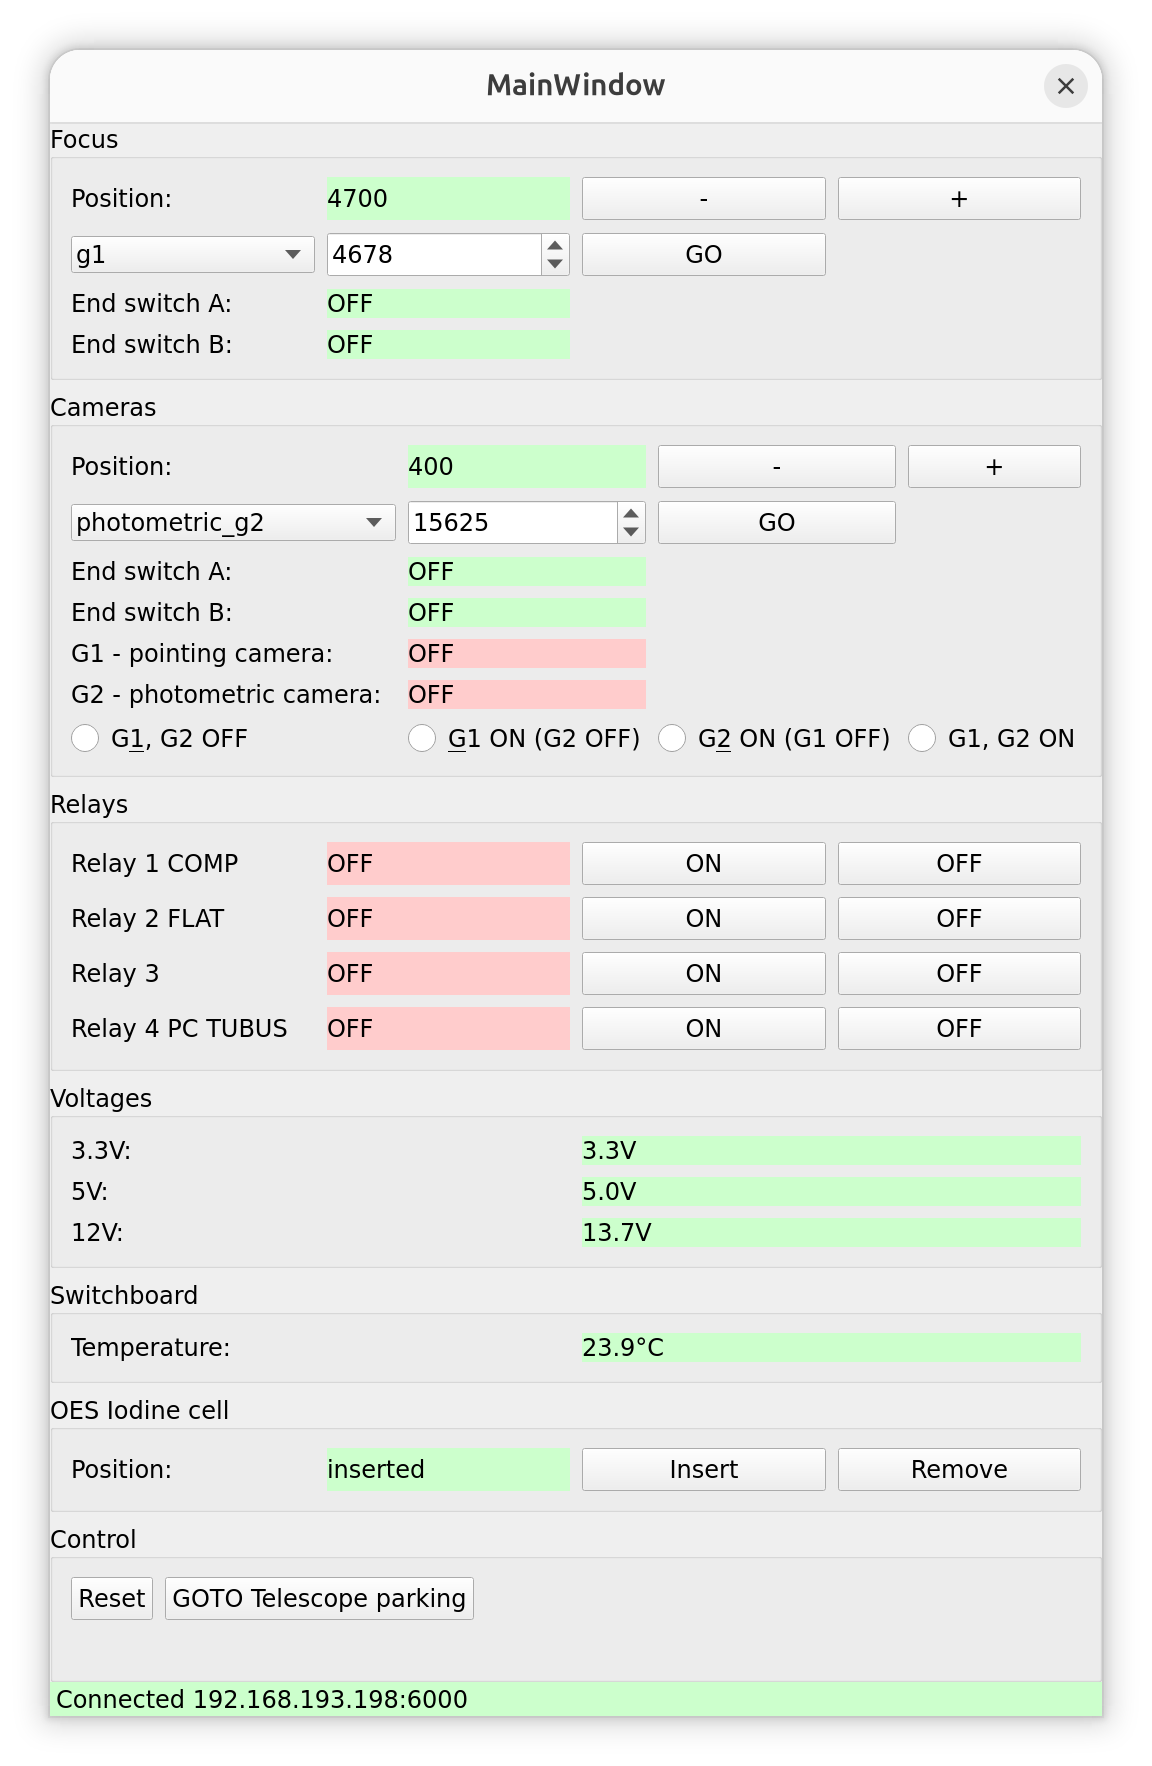
Pointing camera on, and check the focus
TOPTEC. Two things, one of which people forget until the frames are ruined.
- In Cameras, select G1 ON (G2 OFF). G1 is the pointing camera — the one the fibre pointing client exposes with. Without it there is no acquisition image.
- At the top, in Focus: do check your focus. It is the first control in the window for a reason, and a night of beautifully centred, badly focused spectra is a sad thing.
Check the binning is 2×8
FLORES client → Camera settings. It usually is. Nothing enforces it, so look.
2×8 is the default and the sweet spot: good readout noise, and it does not yet destroy
the image. Everything reduced so far was taken this way — the frames carry
BINNING = '2x8'. But it is only a default. Anyone who changed it left it changed,
and it will still be changed when you arrive.

Cooling: usually just there
The chip goes to −30 °C automatically every evening and switches off in the morning. The Cooling panel shows you the temperature and the set point, and you may as well glance at it — like the temperature gauge in a car. It is not normally a topic. (In the picture above it reads 21.9 °C with cooling off: that is a daytime screenshot, not what you should see at night.)
The comp — and the number that saves your night
TOPTEC → Cameras position, then Relay 1 COMP. The one thing nobody could guess.
The stage position in TOPTEC's Cameras panel decides what the chip sees: which fibre, and whether it sees the sky or a lamp. The named presets are:
| Preset | Position | |
|---|---|---|
| object 1 fiber | 400 | |
| object 2 fiber | 1050 | the one you want — see B2 |
| comp 1 fiber | 12965 | overexposes |
| comp 2 fiber | 13615 | overexposes |
| comp, both fibres | 13290 | type it by hand |
| flat 1 fiber | 14600 | |
| flat 2 fiber | 15250 | |
| flat, both fibers | 14930 |
Never send the lamp to a single fibre
There is a flat, both fibers preset, but no comp equivalent — and 12965 or 13615 puts the ThAr lamp squarely onto one fibre. Both overexpose the CCD, and the frame is not the only casualty: the chip keeps a memory of it and stays unusable while the residual clears.
Measured warm, in daytime, it took about half an hour to fade. The release is thermally driven, so at −30 °C expect it to take longer. This is the expensive mistake of the night, not a nuisance.
So type the position in by hand. 13290 is exactly the average of the two comp presets, so the lamp lands between the fibres and both get a moderate, properly exposed comp spectrum at once:
Then Relay 1 COMP → ON, expose in the FLORES client, Relay 1 COMP → OFF. A full calibration is a pair of exposures, back to back without touching anything in between:
- 60 s — the full comp. Carries the wavelength solution across most of the range. You want two rows of sharp lines, not a white slab.
- 1 s — immediately after it. In a 60 s exposure the strong argon lines in the near-infrared saturate, and a saturated line is no use for a wavelength solution. The 1 s frame resolves those same lines cleanly, and combining the two in processing is what stabilises the solution at the red end.
The same 1 s exposure has a second, separate job: taken between targets during the night, it is your cheap check comp — it tells you whether the solution has moved, without costing a minute of sky.
At least one 60 s + 1 s pair per session
A prism holds its wavelength solution well as long as the mirror does not move. But the mirror rides on the filter wheel, so every rotation moves the zero point — including one that brings you back to position 4, which lands a little differently each time. Drift within a session is possible; a change across a wheel move is certain.
So take at least one full comp pair before the wheel turns again. A comp from an earlier session will not calibrate this one, and short comps cannot carry a solution across the move either — they tell you whether things drifted, they do not re-derive the scale. That kind of relative calibration is untested and the pipeline does not implement it. If the wheel moved and you have no full comp from after the move, that data has no wavelength scale.
Within a session, stability is likely but not guaranteed
You do not need a full comp per target. Take 1 s check comps as you go, and if the session runs long, take further 60 s + 1 s pairs as the hours pass — the solution is usually stable, but it is not assured, and a second full comp costs you a minute.
One night’s rhythm
How the instrument’s author actually runs a session:
1 s comp
  target            (long-ish)
  standard          (Vega, or another spectrophotometric standard)
1 s comp
  target
  standard
  ...
1 s comp
60 s comp + 1 s     ← the full pair, session closed
With more 60 s comps sprinkled through a particularly long session. This is one defensible scheme, not the only one: everybody has their own religion about calibration, and FLORES is not an instrument anyone is chasing cm/s radial velocities with. How much you calibrate, and what you trust, is yours to decide.

Darks and flats: currently, neither
Both are available. Neither is part of the routine yet.
- Darks are not being taken at the moment. An evening sequence is planned, which will
collect enough to build a proper dark model. planned Until then take
your own whenever you like — set Shutter to
DARKin the FLORES client, same exposure time and binning as your science frames. The chip is cold all night anyway, and darks do not interfere with whatever else the Perek is doing. - Flats are not used in practice — nothing in the reduction needs them. If you want one: position 14930 (flat, both fibers), Relay 2 FLAT → ON, expose 1 s or less, relay OFF.
Observe an object
Repeat this loop for every target. Part A does not need touching again — unless the filter wheel turns, which ends the session and means a fresh comp before anything else counts.
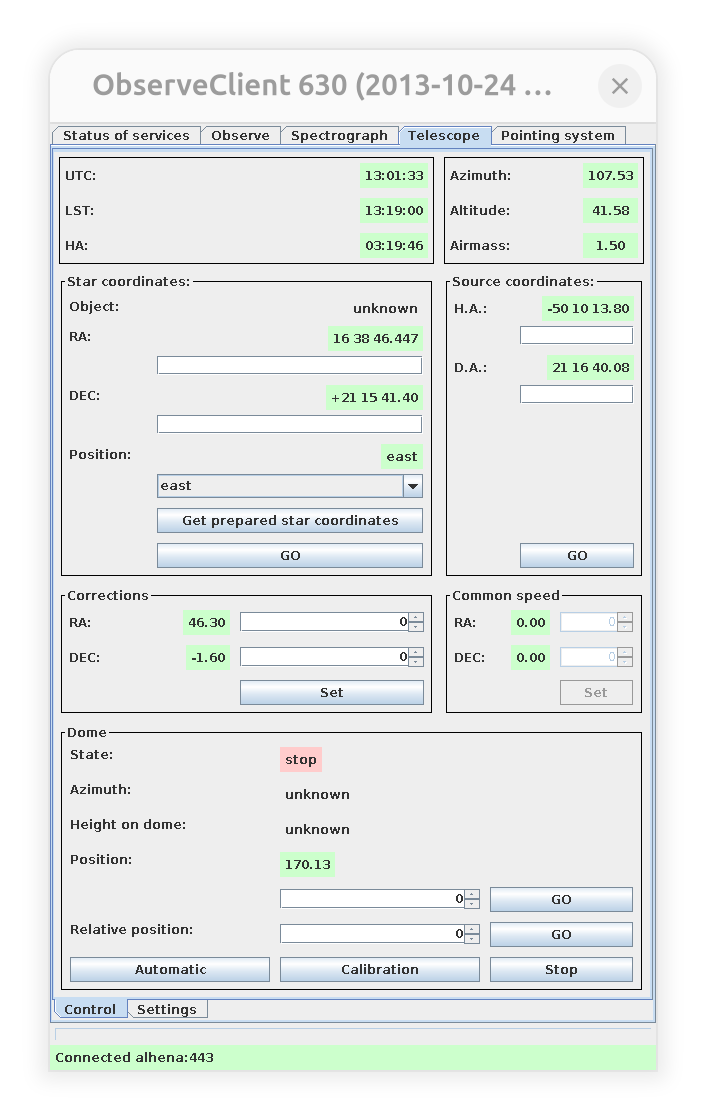
Send the telescope to the target
ObserveClient 630 → Telescope tab.
- Prepare the object in the web database beforehand.
- Get prepared star coordinates loads that position into the RA and DEC fields.
- GO sends the telescope there.
From here on, the coordinates travel with every image the telescope takes — which is what makes the next steps work.
Choose the fibre: position 1050
TOPTEC. Fibre 2 is the untilted one — put the object there.
Every frame carries two fibres, two sky positions about 18 binned rows apart. One of them is geometrically tilted: its lines are not perpendicular to the dispersion axis.
Fibre 1 is perfectly good in every other respect — it is only the tilt, and the tilt only complicates the reduction. The pipeline does correct for it, so a spectrum in fibre 1 is not lost; it is just more work. Whenever you have a free hand, use fibre 2.
You can see the difference on any comp frame: one set of lines is dead straight, the other visibly leans.

measure_tilt.Get the star into the fibre
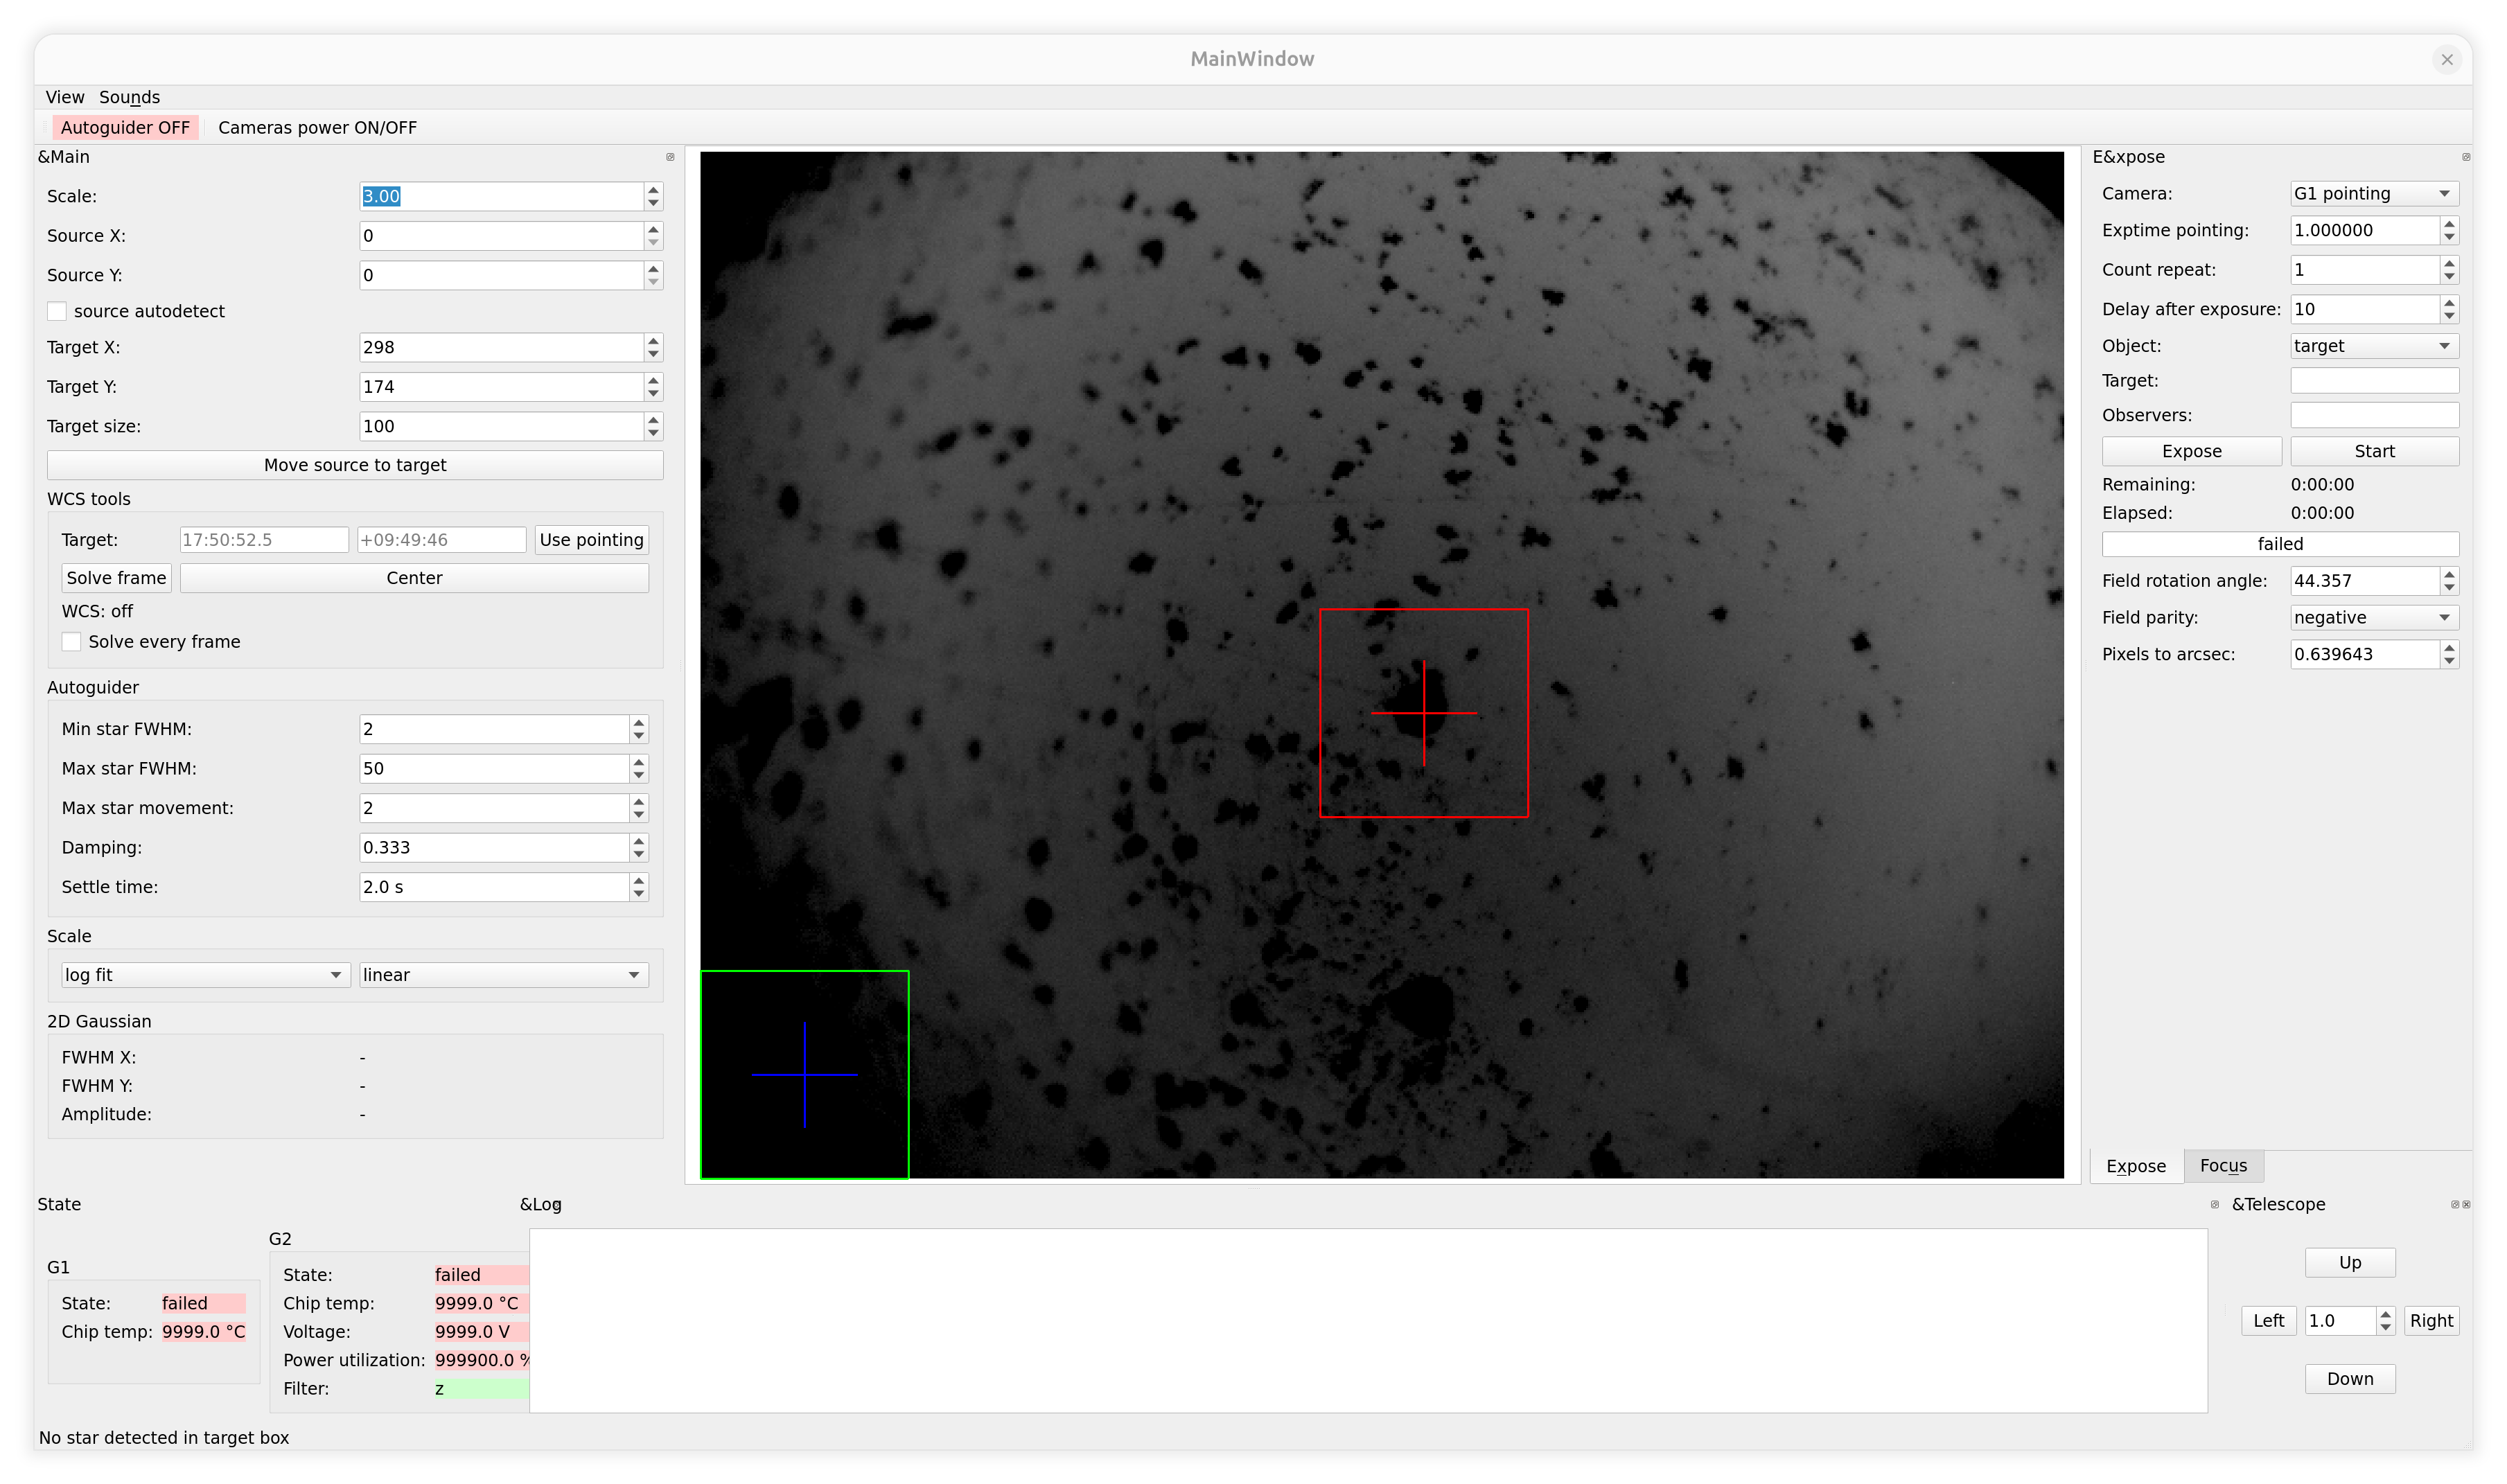
Fiber pointing client. Green box onto red box — that is the whole game.
- Expose with Camera: G1 pointing — a second or so to start with.
- Use pointing fills the Target RA and DEC from the telescope, via the image header.
- Solve frame sends the frame to astrometry.net.
WCS: offbecomes a solution, and the client then knows where everything in the field is. - The red box is the target — the fibre — at Target X / Target Y. The green box is the source, and it is always on screen; what a WCS solution does is move it onto your object.
- Move source to target, or Center, closes the gap. Repeat until the star sits in the red box.
If the solve fails
The log at the bottom of the window says No WCS solution, and the green box simply does not move. You have two ways out, and which one depends on your target:
Bright object: it is probably the brightest thing in the guiding image anyway. Put the green box on it by hand and do not bother with WCS at all.
Faint object, where you are not certain which dot is yours: that is exactly what the solver is for. Expose longer and try again — a frame astrometry.net can solve is usually longer than your normal guiding shot.
Expose
FLORES client. Sixty seconds at a time, for as long as you like.
- Exposure time: 60 s is typical. Long targets are a series of sub-exposures, not one heroic shot — you combine them later, deliberately. For how long yours needs, see how long to expose below.
- Repeat: do not type a huge number. 0 means infinite. Run starts the series and the button becomes stop, which ends it after the current frame.
- Shutter:
LIGHT. - Save to disk must read Saving: ON. If it does not, you are running a very expensive light show.
Then a spectrophotometric standard
If you want fluxes rather than shapes.
Flux calibration needs a standard observed in the same session, and the usual rhythm is one after each target. The pipeline already carries reference spectra for Vega, η UMa, ζ Cas and HR 7596, so those are the convenient ones — and Vega at mag 0 needs 0.1–0.5 s, not a minute.
Match the airmass if you can
The flux calibration applies no atmospheric extinction correction — the frames carry no airmass information for it to use. The closer your standard sits to the target’s airmass, the less that omission costs you.
Log the fibre — and the session
Nothing downstream knows either of these but you.
Both fibres are reduced and written out separately and clearly labelled — but which one held the star and which held sky is your record, not something the pipeline can guess.
Note the session too: one line saying which comp belongs to this frame, and whether the wheel has moved since. When you come back to the data weeks later, that line is the difference between a spectrum and a picture of some lines. Then go back to B1 for the next object.
How long to expose
Three measured points, and what they imply for everything between them.
Those last two points are eleven magnitudes apart, and they agree: photon-limited scaling from the mag 5 point predicts 5.2σ for the supernova where 4.5σ was measured. So the obvious rule of thumb is good to roughly a factor of 1.5, which is less than the weather will cost you anyway:
SNR ≈ 100 × sqrt( t/60s × 10^(-0.4 × (mag - 5)) )Which gives the following, for a spectrum you would call detected (SNR ≈ 10). Multiply by 100 for SNR 100. Resampling to R ~ 200 buys about a factor of two in SNR, which is roughly a factor of five off the time:
| V mag | SNR 10, native | SNR 10 at R ~ 200 |
|---|---|---|
| 5 | 0.6 s | 0.15 s |
| 8 | 10 s | 2 s |
| 10 | 60 s | 13 s |
| 12 | 6 min | 1.3 min |
| 14 | 40 min | 8 min |
| 16 | 4 h | 50 min |
Read it as an order of magnitude, not a promise: it assumes photon-limited, no moon, decent seeing and the star properly on the fibre.
What resolution you actually get
Resolving power is not constant across the range — it peaks in the blue and falls away steadily to the red. Measured from the ThAr arc:
| Wavelength | R | |
|---|---|---|
| 4000 Å | 1300 | |
| 4500 Å | 1750 | peak |
| 5000 Å | 1300 | |
| 5500 Å | 1000 | |
| 6000 Å | 700 | |
| 7000 Å | 400 | |
| 8000 Å | 300 | |
| 9200 Å | 200 | red limit |
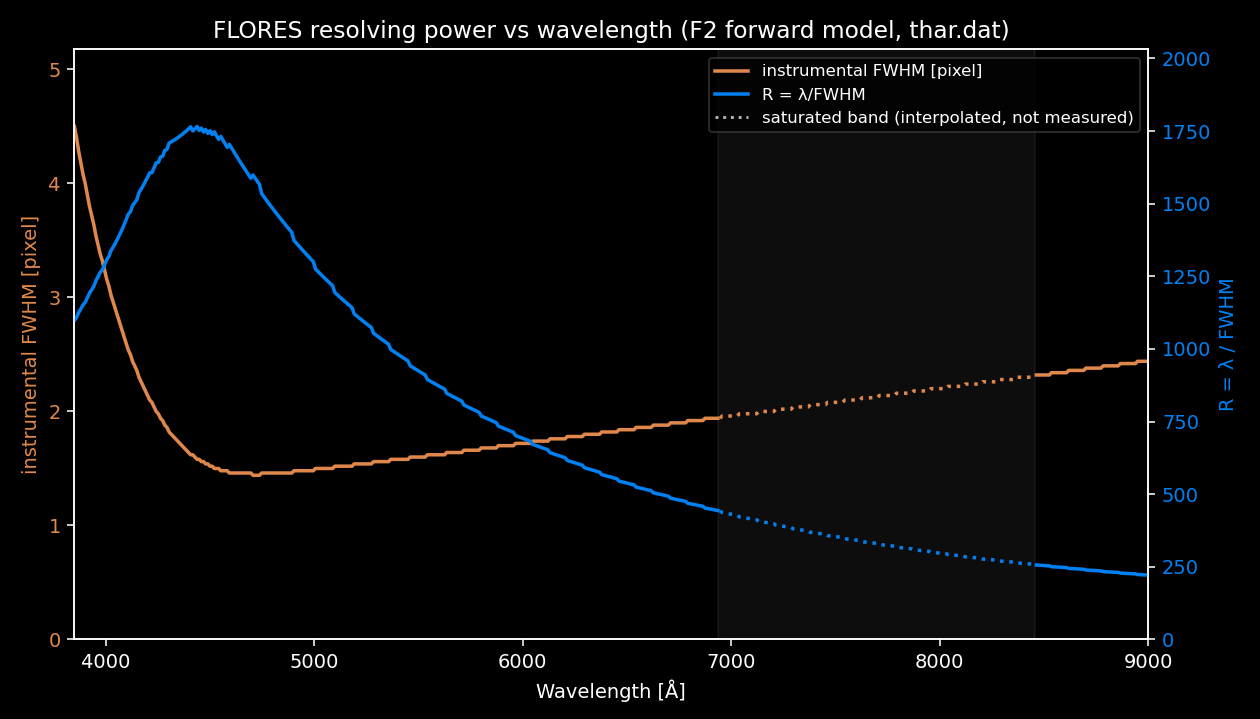
This is also why R ~ 200 is the natural resampling target rather than an arbitrary one: it is roughly what the instrument delivers natively at its red limit. Resampling the whole spectrum there costs you nothing at all in the red, and spends the blue peak — which is a trade worth making deliberately, and only for the targets that need it.
At the faint end, resample
Below about mag 14 the native-resolution column stops being the one to plan from. The real result at the limit — mag 16.3, roughly an hour and a half of 900 s sub-exposures — is a 10σ spectrum at R ~ 200, and only 4.5σ at native resolution. Round it off as about an hour at mag 16, resampled.
So for the faintest targets, plan the resolution you actually need first, and read the right-hand column. Chasing native resolution there costs you five times the exposure for a spectrum you may not be able to use anyway.
Why the design figures are brighter than this
The instrument specification quotes V ~ 17. Until the F2 prisms are anti-reflection coated, reflection losses across four prism surfaces comfortably exceed 50%, and the practical limit sits a little above mag 16. Seeing, the small fibre cross-section and guiding accuracy take their share too — the last of which can still get better. Theory is always the optimist.
Taking your data home
They are not in the archive. Not yet.
Frames are written on the FLORES machine. Synchronisation into the archive is agreed in principle but not implemented, so for now you fetch them yourself — the one place in this whole procedure that still wants a terminal:
ssh flores
cd /images/<year>/<night>      # e.g. /images/2026/20260831
Or point Midnight Commander at /images and browse, if that is more your speed.
They are ordinary FITS frames — at this stage a spectrum is just a 2-D image, nothing special about the files. Copy the whole night: lights, darks and comps.
Reducing it, the next morning
Not installed on the observing machine yet — run it on your own.
Clone it from github.com/mates14/flores-pipeline and read its own instructions. Then, per night:
python3 reduce_flores.py <raw_dir> [--out <out_dir>]coadd_light.py), and the result feeds back in like any other frame.IMAGETYP
(dark / calib / light). Do check it: comps still come out labelled object
sometimes — the 60 s comp pictured in A5 does. When that happens, name them
explicitly with --comps.reduce_flores.py solves each comp frame on its own —
merging the unsaturated near-IR lines of the 1 s frame into the 60 s solution is a
reduction-side step it does not do for you yet.flux_calibrate.py): one response curve is derived from the standards you observed
and applied to everything else. No extinction correction — see B5.When it goes wrong at 4 a.m.
The failures that actually happen.
LIGHT and not
DARK? Is the star actually in the fibre hole rather than near it? Is the
dome open?Still to confirm
The recording this was built from lost these. Nothing here is unknowable — it just needs someone to check it at the telescope.
- The evening dark sequence — once it exists, say here what it produces and how to use it.
- Relative calibration from short comps — whether it works at all, and whether it is worth implementing.